How to Anchor Heavy Duty Racks on Uneven Concrete Floors?

Time:2026-10-12 Author:Isabella
0%

Heavy-duty racks rarely fail because of one obvious mistake. More often, small installation errors combine beneath the frame. A sloping concrete floor can twist uprights, reduce anchor engagement, and create uneven load transfer. That is why how to anchor heavy duty racks on uneven concrete floors requires more than drilling holes and tightening bolts.

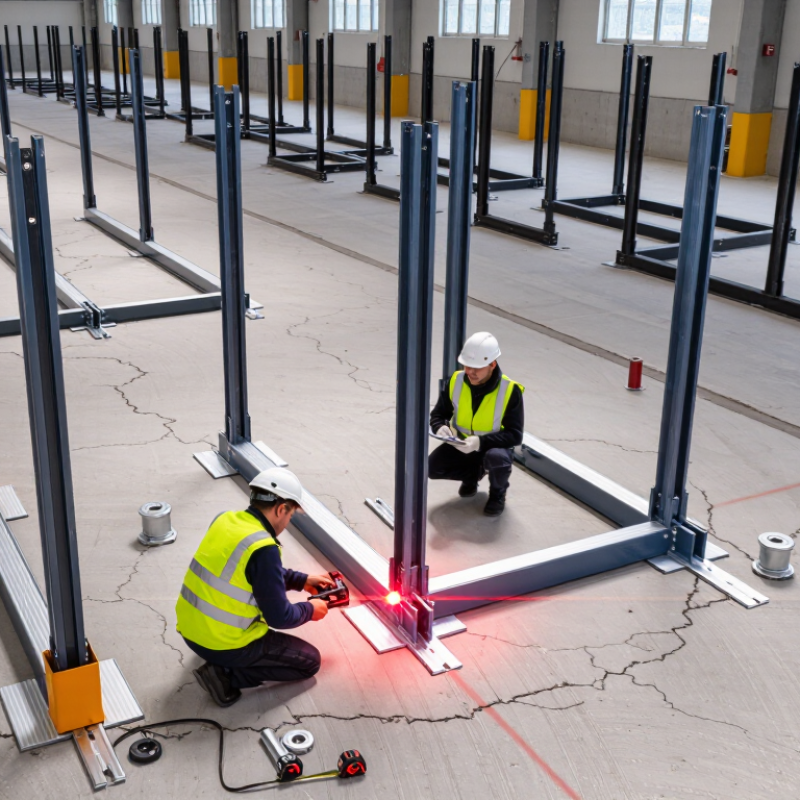
Experienced installers begin with a floor survey. They measure elevation changes with a laser level, inspect cracks, and locate reinforcement or post-tensioning cables before drilling. The rack design should confirm anchor type, embedment depth, edge distance, and required tension capacity. Chemical anchors may suit some conditions, while mechanical anchors may work better elsewhere. The choice should come from engineering data, not habit.

Structural engineer Dr. Robert E. Melchers offers a useful principle: “Reliable connections depend on verified conditions, not assumptions.” That warning matters here. Leveling plates, engineered shims, or non-shrink grout can support the base, but random washers are not a design solution. Never force a twisted frame into alignment. It may look correct today.

The installation also needs a torque-controlled final check. Each anchor should be tightened according to its manufacturer’s instructions. Inspectors should verify plumbness, base contact, anchor projection, and aisle clearance. Photographs help document hidden work. Still, documentation alone cannot correct a weak slab. Local building requirements and a qualified structural engineer should guide the final decision, especially near joints, cracks, thin slabs, or seismic zones. Some jobs need redesign. That is not failure; it is responsible judgment.
How to Anchor Heavy Duty Racks on Uneven Concrete Floors?

Assess the Concrete Floor and Rack Load Requirements

Before anchoring heavy-duty racks, inspect the concrete as a structural surface, not just a floor. Check cracks, spalling, moisture, joints, and visible repairs. Measure uneven areas with a laser level and a straightedge. Record the highest and lowest points. A small slope can change anchor loading significantly. Surface dust can also weaken the connection.

Review the rack’s actual load requirements. Include pallet weight, beam capacity, upright reactions, forklift impact, and possible seismic forces. Do not rely only on the advertised rack capacity. Calculate the point load at each upright. Then verify slab thickness, concrete strength, reinforcement, and anchor edge distances. A qualified structural engineer should confirm these values from drawings or field testing. Concrete that looks solid may be thinner than expected.

Choose a leveling method that transfers loads evenly. Steel shims, engineered base plates, or approved non-shrink grout may be suitable, depending on the gap. Avoid loose scraps or stacked washers. They can tilt under vibration. Drill only after locating reinforcement, conduits, and joints. Use anchors rated for the calculated tension and shear forces. Clean each hole carefully and follow the installation torque requirements. One detail is easy to miss: recheck plumb after tightening. The rack may move slightly as the anchors seat. If the floor condition remains uncertain, stop and obtain a professional assessment. Guesswork is cheap until the rack shifts.

Select Anchors, Shims, and Base Plates for Uneven Surfaces

How to Anchor Heavy Duty Racks on Uneven Concrete Floors?

Select Anchors, Shims, and Base Plates for Uneven Surfaces

Uneven concrete changes how a rack transfers weight to the floor. I begin by checking cracks, weak patches, floor slope, and anchor locations. A laser level helps reveal small height differences that a straightedge can miss. Do not force a rack into level with anchor bolts. That can bend the base plate and reduce contact.

Choose anchors according to concrete strength, embedment depth, edge distance, and expected tension and shear loads. Expansion anchors may suit sound concrete, while approved chemical anchors can help when vibration or limited edge distance matters. Follow the anchor manufacturer’s installation data and the rack engineer’s load requirements. Field conditions are rarely perfect.

Use steel shims with known load capacity, not loose washers or scrap metal. Place shims directly beneath the base plate, keeping them stable during drilling and tightening. For larger gaps, a properly designed leveling plate or non-shrink grout may provide better support. Base plates should be thick enough to resist bending, with holes that match the selected anchors.

After leveling, tighten anchors gradually and evenly. Recheck plumb, bolt torque, and shim movement after loading the first rack bay. I have seen carefully installed racks shift because the final inspection was skipped.

One detail still deserves caution: a level rack is not automatically a safe rack. Structural review remains necessary when floors are damaged, slopes are severe, or loads change.

Position and Level the Rack Before Drilling

Anchoring a heavy-duty rack on uneven concrete begins with positioning, not drilling. Place the rack near its final location and inspect the floor for cracks, high spots, and loose debris. A small ridge can tilt an entire frame. Use a spirit level on the front, side, and top beams. Check both directions. Adjust the rack with steel shims or approved leveling plates beneath each base plate. Keep the frame plumb while checking the rack’s footprint. Do not rely on the anchor bolts to correct a leaning structure.

Tips: Mark each base-plate hole only after leveling. Measure diagonals between opposite corners to confirm the frame is square. Use temporary clamps or braces if the rack shifts during measurement. A laser level can reveal height differences that a short spirit level misses. Keep shims fully supported under the plate, not hanging beyond its edge. Small details matter.

Once the rack is stable, recheck clearance around walls, doors, sprinklers, and nearby equipment. Confirm that every base plate sits flat and that no corner rocks under hand pressure. I have seen installers drill too early, then discover a gap beneath one plate. Fixing that mistake takes longer than careful setup. Mark the concrete through the holes, move the rack if necessary, and drill only when the frame remains level and plumb. Remove drilling dust before inserting anchors, then tighten them gradually and evenly. Recheck alignment after tightening, because the frame can move slightly. Load the rack only after the anchoring system and floor condition have been verified by a qualified professional.

Drill, Install, and Tighten the Concrete Anchors

Anchoring heavy-duty racks on uneven concrete begins with a careful floor check. Measure the slope, locate cracks, and avoid drilling near visible joints. ACI 318-19, Chapter 17, requires anchor design to consider concrete breakout, pullout, shear, and edge distance. That matters when one rack foot sits higher than another. Do not use the anchor bolt to force the frame level. Place steel shims or a properly designed leveling plate beneath the base.

Drill each hole with the correct diameter and depth listed in the anchor’s evaluation report. Keep the drill perpendicular to the concrete surface, not the tilted rack frame. Remove dust with brushing and oil-free compressed air. A dirty hole can reduce reliable engagement. It is a small step. It is often rushed. ICC-ES AC193 evaluates mechanical anchors under tension and shear conditions, but site preparation still controls real performance.

Set the anchor through the base plate, then tighten it with a calibrated torque wrench. Follow the specified sequence, and never guess the torque value. Adhesive anchors need the required cure time before loading. BLS reported 4.8 recordable injury cases per 100 full-time workers in warehousing and storage during 2022, showing why stable storage equipment deserves disciplined installation. OSHA 1910.176(b) also requires stored materials to remain stable against sliding or collapse. Recheck plumb, shim contact, bolt torque, and rack alignment after loading. The first inspection may miss movement. Reinspect it.

Inspect the Installation for Stability and Safety

Uneven concrete changes how a rack transfers load into the floor. Inspection must begin before anchoring. Check for cracks, spalling, hollow areas, oil contamination, and unexpected slopes around every baseplate. A laser level can reveal height differences that a short spirit level misses. Record each measurement, not just the worst one.

After installation, confirm every column is plumb and every baseplate sits firmly. Shims must be secured and fully supported, never stacked loosely. Check anchor embedment, edge distances, washer contact, and tightening torque against the engineer’s specification. ANSI/RMI MH16.1-2023 provides structural criteria for industrial steel storage racks, but site conditions still require competent engineering judgment. A torque mark helps identify movement during later inspections. Small details matter.

Load the rack gradually, then inspect it again. Look for leaning frames, open gaps beneath plates, bent anchors, displaced shims, and beam connector movement. Check that locking pins are fully engaged. OSHA’s 2017 fatality review recorded 75 construction deaths involving struck-by incidents, showing why unstable storage deserves immediate attention. NIOSH case investigations also repeatedly connect falling materials with poor storage control and inadequate hazard recognition. Do not assume a quiet rack is a safe rack. Concrete can continue crushing beneath a plate. Recheck after initial loading and after any impact. My practical mistake was trusting a clean torque mark without checking the baseplate gap. The mark looked right. The support was not.

FAQS

What should I inspect before anchoring a heavy-duty rack?

Inspect the concrete as a structural surface. Check cracks, spalling, hollow areas, moisture, oil, joints, and old repairs. Surface dust can weaken the connection. Record every defect and measurement.

How can I measure uneven concrete accurately?

Use a laser level and a straightedge. Measure the highest and lowest points around every baseplate. A short spirit level may miss small slopes. Small gaps matter.

What loads must be included in the rack assessment?

Include pallet weight, beam capacity, upright reactions, forklift impact, and possible seismic forces. Calculate the point load at each upright. Advertised capacity alone is insufficient.

How do I confirm the slab can support the rack?

Verify slab thickness, concrete strength, reinforcement, and anchor edge distances. Use structural drawings or field testing when available. A qualified structural engineer should confirm uncertain values. Concrete can look stronger than it is.

Which leveling methods are suitable?

Steel shims, engineered base plates, or approved non-shrink grout may work. The method depends on the gap and load. Avoid loose scraps or stacked washers. They can tilt under vibration.

What should I check before drilling anchor holes?

Locate reinforcement, conduits, and joints before drilling. Select anchors rated for calculated tension and shear forces. Clean each hole carefully. Follow the specified embedment and tightening torque.

What should I inspect after anchoring the rack?

Confirm every column is plumb and each baseplate sits firmly. Check embedment, edge distances, washer contact, torque, and secured shims. Marked anchors help reveal later movement. Do not trust markings alone.

How should I inspect the rack after loading?

Load it gradually, then check for leaning frames, baseplate gaps, bent anchors, displaced shims, and moving beam connectors. Confirm all locking pins are engaged. Recheck after impacts or unusual movement.

What should I do if the floor condition remains uncertain?

Stop installation and obtain a professional assessment. Guesswork seems inexpensive until the rack shifts. I once trusted a clean torque mark. The baseplate gap still needed attention.

Conclusion

Learning how to anchor heavy duty racks on uneven concrete floors begins with a careful assessment of the floor condition, slab thickness, cracks, surface variation, and the expected rack loads. Confirm that the rack layout, upright spacing, and load capacity are suitable for the environment. Select concrete anchors, steel base plates, and durable shims that can support the weight without creating unstable gaps. Position the rack in its final location, then use a level to adjust each upright until the structure is plumb and evenly supported.

Once the rack is aligned, mark the anchor holes through the base plates and drill to the required depth using the correct bit and method for the concrete. Remove dust and debris before installing the anchors, then tighten them gradually and evenly to secure the rack without distorting its frame. Finally, inspect the installation for movement, loose hardware, uneven loading, and adequate contact between shims, plates, and the floor. Recheck the rack after loading and schedule routine inspections to maintain long-term stability and safety.

Isabella

Isabella

Isabella is a dedicated marketing professional with a sharp focus on driving brand growth and engagement through strategic content creation. With an extensive background in digital marketing, she combines her passion for storytelling with her keen understanding of industry trends to deliver......